Who Stole My Pictures?

Reverse Image Searching with TinEye

I’ve mentioned TinEye in passing before, for protecting your images and your reputation online. TinEye is a reverse image search, meaning you upload or link to an image, and it finds all the places the same image appears online.

Using TinEye periodically on images in your online portfolio can help you find unauthorized usage of your images on other sites. The best course of action from there is up to your discretion—you could ask for a credit line and a link to your site, request they remove the image, demand payment, or file a DMCA Takedown.

But uploading or linking each image from your site to TinEye is tedious and time consuming. And TinEye’s database hasn’t indexed every image on the web (“only” 2.18 billion) which means it might not find all cases of infringement. For a more exhaustive search you’d have to repeat the process on Google Images, the Russian search engine Yandex and the Chinese search engine Baidu.

Instead, you can use browser plugins/extensions such as Who Stole My Pictures for Firefox and RevEye for Chrome to search all of these engines at once. Simply right click on the image and select Search All In Tabs (or something similar). A tab will open to each site showing the results.

Thanks to my pal Chad for the tip!

How do you protect your images online, and how do you deal with infringers? Let me know your opinions in the comments!
SubScribe Illustrator Plugin

httpvh://www.youtube.com/watch?v=D5lk-XKShhM

Astute Graphics has done it again. In what seems like a quest to put all of Adobe Illustrator’s native tools to shame, they’ve released a new plugin suite called SubScribe. Included are tools for drawing circles based on 2 or 3 points, connecting and straightening lines, drawing arcs, rotating and orienting artwork and drawing tangents and perpendicular paths (as shown in the video above).

Time to reassign some hotkeys.

SubScribe is free to all Astute Graphics customers.

Wrapping Patterns Around Cylinders

Wrapping Patterns Around Cylinders

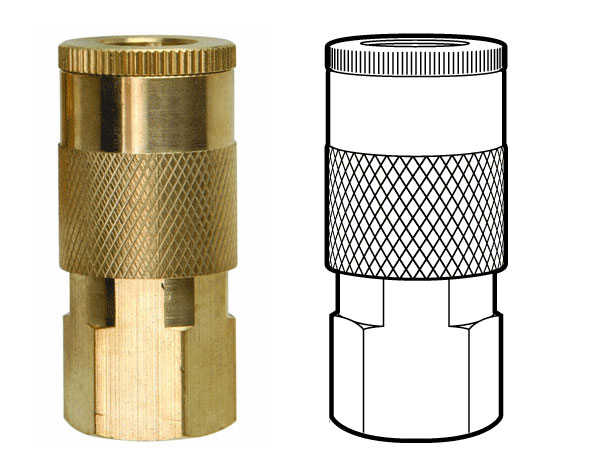
Brett wrote in looking for a way to accomplish a diamond grip pattern wrapping around a cylinder, like the one shown above. It’s easy enough to trace a photo, but what if you didn’t have one, or it wasn’t at the right angle?

The technique I’d use is similar to mapping a label to a can.

Wrapping Patterns Around Cylinders

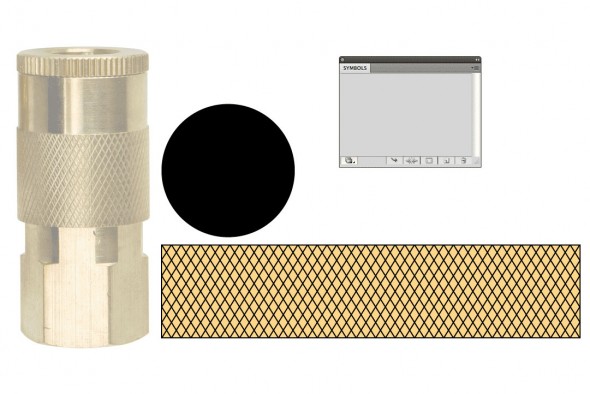
1. Create the artwork you’ll need. The diamond pattern matches the angle and density of the original. The black circle is the same diameter as the reference part, and is filled with no stroke.

Wrapping Patterns Around Cylinders

2. Make the pattern a symbol. Drag the pattern into the Symbols palette.

Wrapping Patterns Around Cylinders

3. Extrude the circle. Go to Effects > 3D > Extrude & Bevel. Click the Surface dropdown at the bottom and select Wireframe. This will help you orient the cylinder to the desired angle. I usually start by entering 0° for all the rotation angles, then rotating one axis at a time by grabbing the edges of the preview cube.

You may need to reposition your cylinder to line up better with a reference image. To do this, Click OK, move the cylinder as needed, then open your Appearance pallete and double click on the 3D Extrude & Bevel item. You may need to turn Preview back on.

When you’re happy with your geometry, click Map Art…

Wrapping Patterns Around Cylinders

4. Map Art. Click through the Surfaces to find the rectangular side surface. Then select your pattern from the Symbol drop down. Next, select Scale To Fit at the bottom and check off Invisible Geometry. Click OK.

Wrapping Patterns Around Cylinders

5. Change Surface to Flat Shading. Click OK. You can now edit the artwork as needed by going to Object > Expand Appearance. In my example, I changed the yellow fill to white, then drew the rest of the lineart on another layer.

Have a common problem in Illustrator? Let us know in the comments, or email it to suggest@technicalillustrators.org!

Shooting On-Angle Photos

Shooting On-Angle Reference Photos

Often the most difficult and time consuming part of technical illustration is finding good reference material. While the internet serves up a limitless selection of images, finding one at an appropriate size, fidelity, viewing angle, and unambiguous copyright status, can be next to impossible.

Sometimes it’s much quicker to simply step away from your desk and go snap a photo of whatever you need. Of course, this isn’t practical if you’re drawing a submarine or a satellite, but it can help if you’re trying to fill a scene with commonplace objects.

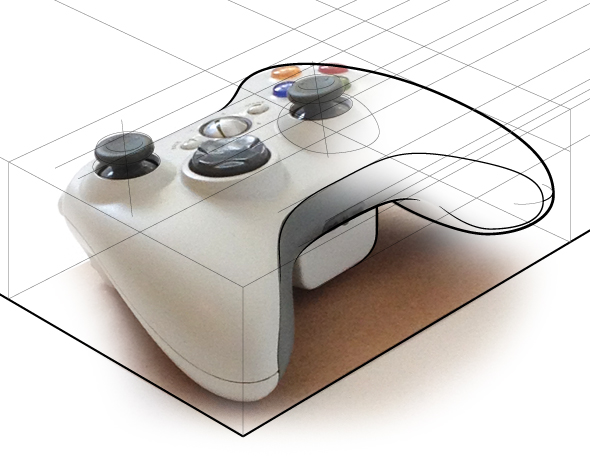
Where it gets tricky is matching your photo reference up to the rest of the drawing. We’ve all seen drawings badly traced and assembled together from photos taken at different angles. We can recognize this because we understand perspective. So let’s apply that understanding when shooting our own photos.

Read More

Create Proper Gears & Conical Gradients

Iaroslav Lazunov has a great tutorial over on Astute Graphics’ blog on how to create proper gears in Adobe Illustrator. This tutorial makes use of the plugin VectorScribe, but the same results could be achieved with Illustrator’s default tools with some extra steps.

An important distinction is made here: Proper Gear. Most gears that show up in illustrations and icons would not work with any efficiency and some would just shred to bits. While you wouldn’t necessarily 3D print these and use them, you’ll end up with something that at least looks like it would work (unlike the failboat below).

Department of Innovation: Going Nowhere Fast

Also included in the tutorial is a way to accomplish conical gradients in Illustrator (unfortunately the technique is extremely convoluted).

Conical Gradient in Illustrator

Check out the tutorial!

Astute Graphics VectorScribe

It’s been a great summer break, but now it’s back-to-school here at TechnicalIllustrators.org.

I thought I’d share what I’ve learned using Astute Graphics’ VectorScribe plugin for Adobe Illustrator (previously) over the past few months. I’ve put together a bit of a demo video highlighting some key features of the suite that I’ve found helpful.

httpvh://www.youtube.com/watch?v=AydOgXNnQjs

This only scratches the surface—As mentioned in the video, be sure to check out Astute’s video tutorials to learn about all the features in detail. I think this package is a great, feature-rich and intuitive extension to Illustrator’s toolkit.

If you’re using VectorScribe or have tried the demo, let me know your thoughts in the comments!

Vector Scribe Illustrator Plugin

httpvh://www.youtube.com/watch?v=Y1TEqhiyZ3k

I’m excited to introduce to you a new plugin suite for Adobe Illustrator, VectorScribe by Astute Graphics.

VectorScribe fills the gaps in Illustrator’s toolbox. These tools give you intuitive yet precise control over your points, paths and shapes—without creating Effects or file incompatibilities across versions of Illustrator. VectorScribe lets you work with your vectors instead of around them.

I’ll go into detail about each tool in the suite later, but in the meantime have a look at some videos and check out the free 7 day trial.

Full disclosure: I was a volunteer beta tester for this software and received a complimentary copy.

VectorScribe by Astute Graphics – $119

Full disclosure: As a beta tester, I received a complimentary copy of this plugin.

Animation Resources for Technical Illustrators

httpvhd://www.youtube.com/watch?v=1Xhdy9zBEws

If your new year’s resolution was to learn how to bring your illustrations to life with motion and interactivity, you are in luck. Below I’ve gathered some resources, tutorials and inspiration to get you started on your journey.

Adobe Flash

For better or for worse, Flash has been around for 15 years. While rival technologies may be digging its grave, Flash remains the most intuitive animation tool for users of Adobe Illustrator — and 15 years worth of online tutorials and forum discussions make for an easy learning curve.

Both made by Adobe, Flash and Illustrator work pretty well together (although, not as well as you might expect). Like Illustrator, Flash is vector based and can import .AI vector artwork along with bitmaps and video files. Illustrator can export .SWFs for Flash, and later versions (AI CS3+) can even include symbols, animation clips and dynamic objects.

In addition to animation tools, Flash also has a programming language called ActionScript (AS) with which you can make your animations interactive. There are three versions of ActionScript (AS1, AS2, AS3) which are not cross-compatible, each more esoteric than the last. I find AS2 to be the right mix of natural-language programming and breadth of possibilities, and seems to have the most tutorials too.

Resources:

Create Flash Animations Entirely in Illustrator
Illustrate and Animate a Bouncing Ball
Kirupa – Flash & ActionScript Tutorials
AdobeTV – Learn Flash CS5 Professional

Adobe After Effects

AE is a beast of a program; it’s like the Photoshop of video. It’s used for 2D & 3D motion graphics, editing, compositing, post-production and special effects for video, TV and film. And like Photoshop it can be used to create entire projects from start to finish, but its real strength is in manipulating and compositing assets made by other means, such as Illustrator and 3D applications.

AE takes just about anything you can throw at it — AI, EPS, PSD, PNG, PDF, MP3, WAV, AVI, MOV, even camera movements from popular 3D software — and spits out a wide variety of video formats.

Although AE does allow you to control animations and effects with scripting, it only exports video meaning no interactivity with AE alone.

Resources:

Intro to After Effects
Build a Car Racing Scene from Photographs
Greyscale Gorilla – After Effects Tutorials
AE Tuts
AdobeTV – Learn After Effects CS5

Ai to Canvas

Ai to Canvas is a plug-in for Adobe Illustrator produced by developers at Microsoft. It enables Illustrator to export vector and bitmap artwork directly to a new HTML5 web element called a Canvas. Canvas-enabled browsers (latest versions of Firefox, Chrome, Safari, Opera) can then interpret and render that content for viewers.

The advantage over simply exporting images for the web is that artwork in a Canvas element remains vectored and can be animated and manipulated with JavaScript code. In fact, Ai to Canvas allows rudimentary animation simply by renaming your layers.

The fact that Canvas doesn’t rely on a browser plug-in (like Flash does) means that your animation & interactivity will run regardless of the viewer’s installed components. This means content presented in a Canvas element are viewable on Apple’s iPad, iPhone and iPod Touch, since they disallow browser plug-ins. I made this HTML5 demo to try it out.

Resources:

Ai to Canvas Plug-In for Illustrator
Ai to Canvas Samples & Documentation
Canvas Element Tutorials & Documentation

Use What You’ve Got

You don’t necessarily need a fancy program to create rich animated and interactive media. Photoshop is equipped with an animation palette suitable for creating flipbook type animations; Here’s a primer.

Failing that, try to be creative with the tools you have. Here are two web pages that feel animated, using only static assets:

Ben the Bodyguard
Lost Worlds Fairs: Atlantis

Have a tool or resource to recommend? Let me know in the comments and I’ll add it to our Resources page!

Adobe Illustrator Gripes & Feature Wishlist

I’m going to have the ear of 3-4 developers from Adobe’s Illustrator team sometime in the next few days. They want to know what makes our life difficult, and what would make it easier. What are your gripes, pain points, repetitive stress injuries? What is your dream feature? What are you accomplishing with plug-ins that should really be built in?

Let me know in the comments, or by editing the fancy Google Doc after the jump.

Read More