Adobe Illustrator CS5 - Perspective Grid
It’s that time of the year when we’re blessed/cursed with another release of Adobe’s Creative Suite software and the inevitable question of whether or not to upgrade. For those of you teetering on the edge, here’s the push you may need to break out the credit card.
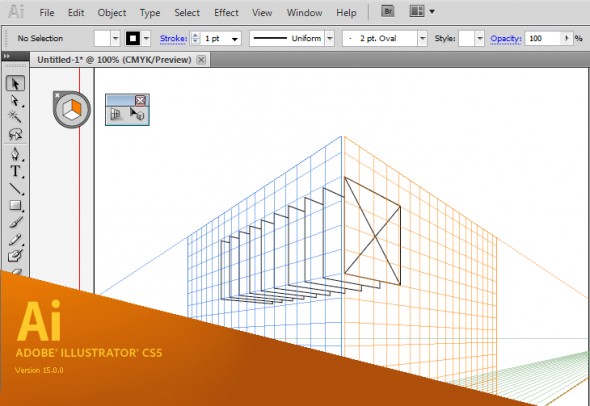
Brand new to Illustrator CS5 is an embedded perspective grid and all the accompanying tools you’ll need to streamline your perspective drawing work flow. I was lucky to be part of the beta testing for this tool, along with fellow TechnicalIllustrators.org contributor Cody Walker, and I have to say I’m really pleased with how it turned out.
Anil Ahuja of Adobe has posted a tutorial that shows most of the features of the perspective grid. Have a look at it here. Check out the PDF at the bottom – it goes into more detail regarding how the tools are used. A sample of the file is there as well, but you’ll need a copy of CS5 to open it.
The grids come in default one-point, two-point and three-point perspectives, but you can tweak everything – vanishing points, origin, grid size, the height of the horizon and much more. When the grid is active, the shape tools all conform to a plane (chosen by you with the 1, 2 and 3 keys). Once objects are on the grid they can be copied and moved perpendicularly through the space as well.
However, for me the true power of this tools comes from the ability to transfer flat orthographic drawings directly to the grid. The only drawback is that raster images are not supported – only vector shapes can be applied to the grid.
The new tools will not obsolete or undermine our abilities as technical illustrators. Rather, as Anil states:
“…please understand that Perspective Drawing in Adobe Illustrator CS5 is NOT a 3-D environment. It is an extension of traditional perspective drawing technique. An artist will have a capability to define a perspective grid (one-point, two-point or three point), define a relative scale, move the grid planes and draw objects directly in perspective or attach flat art onto them by dragging with the new Perspective Selection tool.”
Also, all the old quirks of working with a grid are still there – so don’t throw out your techie toolkit just yet!
I highly recommend downloading and trying out the new version of Adobe Illustrator cs5. A 30-day trial is available on Adobe’s site.
We have this on the computers at AAU but at home I’ve only got CS4. Is there a way to achieve this effect with CS4. If so, could you guys show that and the pros and cons between both versions methods?
I don’t think you can do that in CS4, you could make your own grid but in CS5 when you copy parts along a plane it changes them to match the perspective. So if you draw one window on the side of a building, I think you can copy it multiple times and it will fit the perspective.
I agree with Clint; there is no Perspective Grid in CS4, aside from building one yourself.
It is possible that a third party plug-in is available, but I’m not aware of it.
CS5 allows you to draw basic shapes directly on the grid. More complex shapes can be drawn in flat or orthographic views and the applied to the grid. Any shape drawn directly on or applied to the grid can be moved (in perspective!) along any of the three planes of the grid. It can also be moved perpendicularly, as Clint mentioned above.
Another benefit is that the grid is live – you can modify it after the initial set up (vanishing points, horizon line, cell size, etc.). Unfortunately, items already on the grid will not modify with it – so it’s still important to make sure you’ve got your grid precisely how you want it before starting to draw.
Basically, the Perspective Grid in CS5 saves you loads of set-up time. It also makes it easy to play with the grid after initial set up. It’s not magic though – you’ll still need to know your basic perspective rules when you start to draw.
This video demos the feature pretty well: http://tv.adobe.com/watch/illustrator-cs5-feature-tour/perspective-drawing/
Ironically the perspective is terribly forced, which emphasizes Steve’s point about knowing how to draw in perspective.
How to apply a grouped object or image on prospective grid in adobe illustrator cs5
Arun, I’ll assume that you’re starting with a grouped object that hasn’t been applied to the perspective grid yet. Once you have your grouped object, turn on the Perspective Grid (Ctrl+Shift+I), and select the Perspective Selection Tool (shortcut Shift+V). Click and drag your grouped object onto the grid. You can change the plane that it will snap to by pressing 1, 2, or 3 while dragging it over the grid. It’s that easy.
I am looking for a tutorial that starts with a picture of a house and then you shall fit the grid on top of it. I find that hard. Can anybody help me?
It’s actually a cool and useful piece of info. I am glad that you just shared this helpful information with us. Please keep us up to date like this. Thanks for sharing.
I am really grateful to the owner of this web page who has shared this enormous post at here.
Also visit my website; traiteur cacher mariage
Hi there I am so glad I found your web site, I really found you
by mistake, while I was researching on Askjeeve
for something else, Regardless I am here now and would just like to
say thanks a lot for a incredible post and a all round exciting blog (I also
love the theme/design), I don’t have time to read it all
at the minute but I have book-marked it and also added in your RSS feeds, so when I have
time I will be back to read more, Please do keep up the
awesome b.
My homepage phenixoption
Hi there it’s me, I am also visiting this web site daily, this web page is in fact pleasant and the people are really sharing pleasant thoughts.
Feel free to surf to my blog post … porte fenetre pvc sur mesure
A motivating discussion is worth comment. I think that you ought to
publish more on this issue, it may not be a taboo subject
but generally people don’t speak about these topics.
To the next! Cheers!!
My homepage … play online slots games
I was curious if you ever thought of changing the structure of your
website? Its very well written; I love what youve got to say.
But maybe you could a little more in the way of content so
people could connect with it better. Youve got an awful lot of text for only having 1 or 2 images.
Maybe you could space it out better?
asdf
asdf
asdf
asdf
asdf
asdf
asdf
asdf
asdf
asdf
asdf