
There is little you can do to stop someone who is determined to steal your images. Watermarks are easily removed and website scripts are defeated with a simple screen grab. These attempts only mar your work and make your site difficult to navigate.
In this tutorial I’m not talking about protection from image thiefs, I’m talking about protection from lost opportunities. Times when your images are inevitably downloaded, blogged, cropped, reblogged, faved and saved, and end up orphaned on someone’s hard drive, ffffound, imgfave, tumblr, or email—especially when that person likes your work and would really love to hire you, if they could just figure out where the image came from.
This happens more often than you think; art directors are constantly grabbing images whenever and wherever they see them, but seldom have the time to organize them and make note of where they came from (they should really be using Evernote). Months or even years down the road they might find your image floating in a random folder, uselessly renamed li4tceEqMb1qe.jpg by Tumblr, your name & website address croppped by an ignorant blogger leaving TinEye with no results.
Wouldn’t it be great if you could tuck your name, website and keywords and copyright information into every image to avoid this situation? You can—using Metadata.
Metadata is data about data—like the Created and Modified dates you see attached to every file on your computer. It’s like a little text file appended to files only adding a few bytes to the total file size. You might already be familiar with EXIF metadata added to JPGs by digital cameras, scanners and phones. The metadata I’m talking about in this tutorial is IPTC, but all you need to know is that by the end you’ll be able to embed your name, website, email, phone number, address and copyright into every image—automagically.
Batch Add Metadata to your Images
with Adobe Bridge
The first thing you’ll want to do is add metadata to all the images you have online, so that when your image goes walkabout, your name and contact information go with it.
1. Make a local backup of your website. Download all your images, or your whole site if it makes it easier, using FTP. Having an exact copy of your website on your hard drive is good practice anyway. Make another local copy, or a ZIP of your entire site in case something goes wrong.
2. Open Adobe Bridge. I am not a fan of Bridge, but this is one thing it’s actually good at. You can also use free tools, but your mileage may vary.
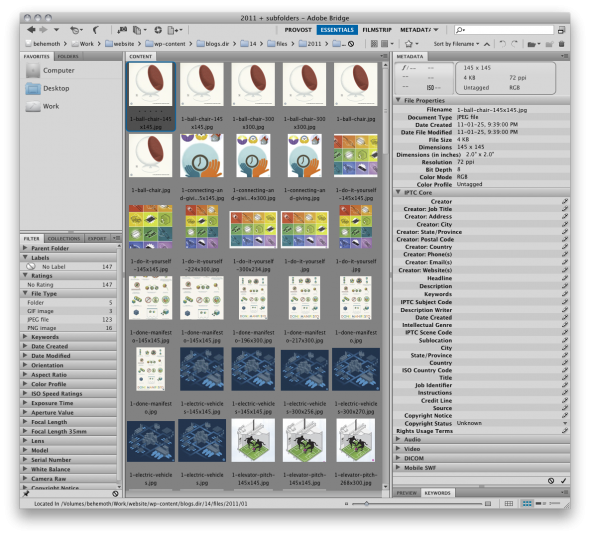
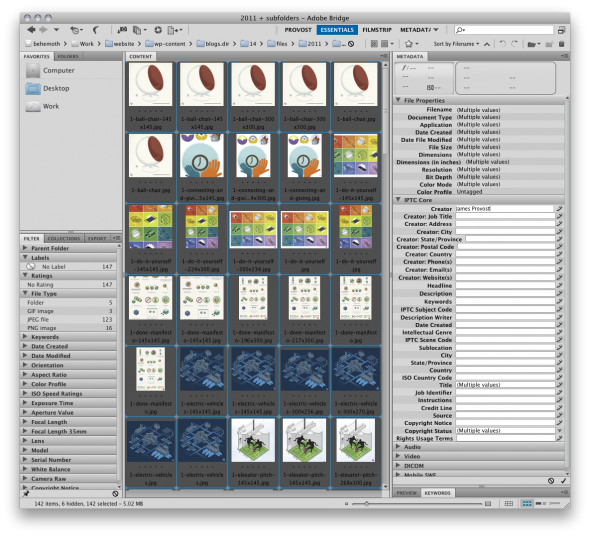
3. Navigate to your images. If your images are organized into folders select View > Show Items from Subfolders and uncheck View > Show Folders. You should now be looking at thumbnails of all your images. Select all by going to Edit > Select All or Ctrl+A.
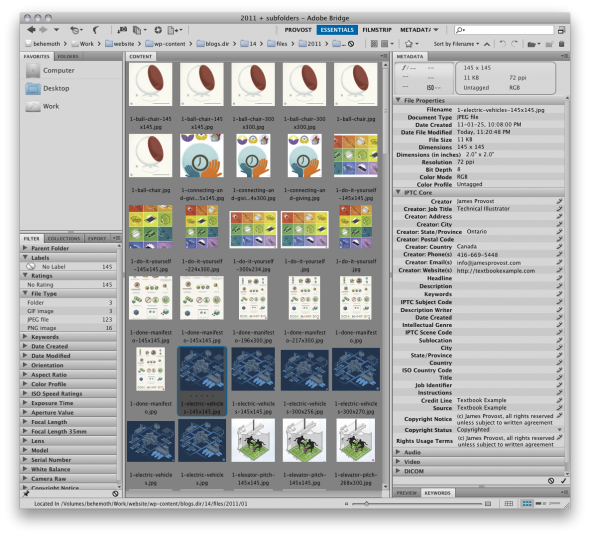
4. Open the Metadata Panel (Window > Metadata Panel) and click one of the pencils on the right. Fill out the desired fields, especially Creator, Creator Website(s), Copyright Notice, Copyright Status, and Rights Usage Terms (this is where you put ©Your Name, All Rights Reserved). Click the checkmark when you’re done.
5. All done! Click one of the images to confirm, then upload everything back to your FTP, overwriting your old files.
Create a Metadata Template in Photoshop
You don’t want to have to open Bridge and type out all that information every time you make a new image (I never want to open Bridge). In Photoshop you can create a template to fill in some fields for you.
1. Start Photoshop and create a new image.
2. Go to File > File Info.
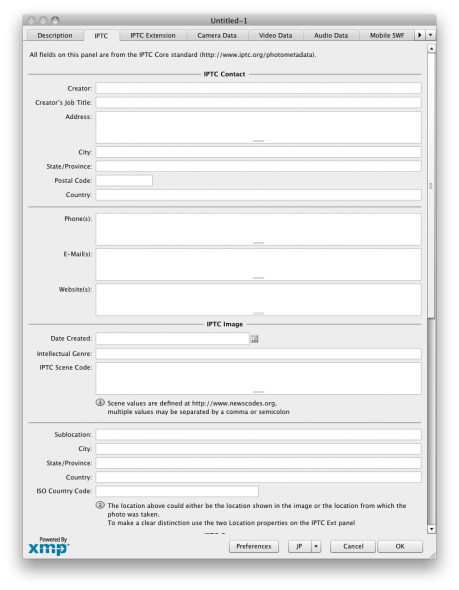
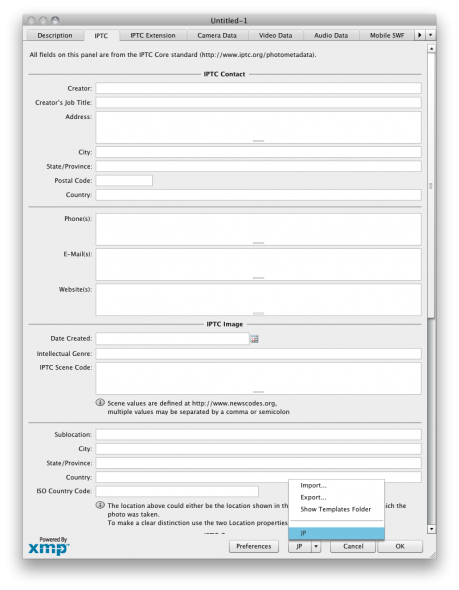
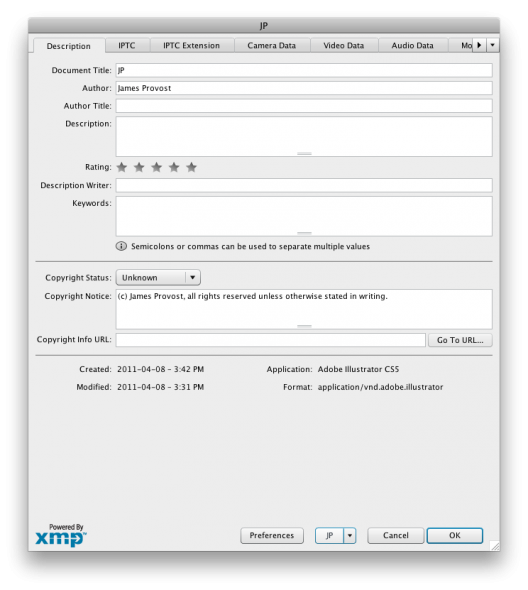
3. This is Photoshop’s Metadata Panel. The tabs we’re concerned with are Description and IPTC, you should recognize some of the fields from our work in Bridge. Fill out the appropriate fields. Note the scroll bar.
4. Create a Photoshop Metadata Template. Click the dropdown button at the bottom, between Preferences and Cancel and select Export. Save your metadata template to the default location with an appropriate file name. When you click the dropdown back in the Metadata Panel, you’ll see your template listed. Click it and it will ask if you want to clear existing properties, keep original metadata and replace matching properties, or keep original metadata and append matching properties. In the future, use whatever is appropriate.
Make Photoshop Automatically Apply
your Metadata Template
If you’re anything like me, you don’t even want to open the Metadata Panel. It’s an extra step and easily automated.
1. Create a new document.
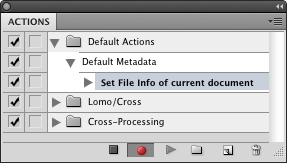
2. Open the Actions Panel. Window > Actions. Actions are a way to perform repetitive multistepped tasks, and even bind them to hotkeys. They record every action until you click the Stop button on the right, then play them back whenever you trigger them with the Play button or hit the assigned Function Key.
3. Click Create a New Action. Give it a descriptive name and click Record.
4. Go to File > File Info. Click the dropdown and select the template we just created. Clear/Replace/Append existing data as you see fit, I selected Clear. Click OK.
5. Click Stop Playing/Recording on the Actions Panel. Add the new action to an appropriate folder.
6. Go to File > Scripts > Script Event Manager. Check off Enable Events to Run Scripts/Actions. This allows application events like starting the program, opening a document or printing to trigger scripts or actions. We want to apply our default metadata whenever we save or export an image. Start by selecting Save Document beside Photoshop Event, and your Default Metadata action. Click Add.
7. Repeat step 6 for Export Document. Click OK.
Update: Make Illustrator Automatically Apply
your Metadata Template
1. Create a new document. Choose settings that you use most frequently.
2. Go to File > File Info. This should look familiar. Drop down the menu in the lower right and select your previously created metadata profile.
3. Go to File > Save As Template.
Mac users, save this template to Username/Library/Application Support/Adobe/Adobe Illustrator/CS5/en-US/new Document Profiles/
Windows users save it to C:/Documents and Settings/Username/Application Data/Adobe/Adobe Illustrator CS5 Settings/en-US/New Document Profiles/
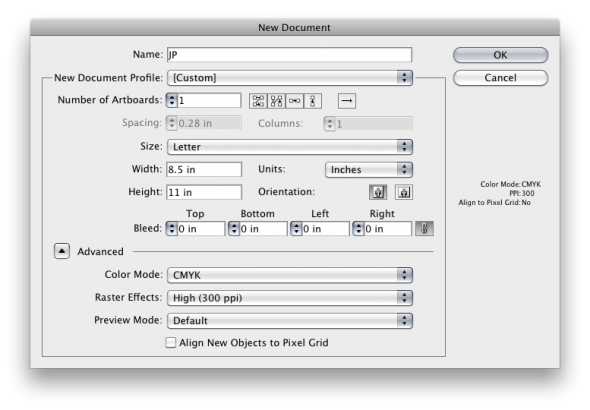
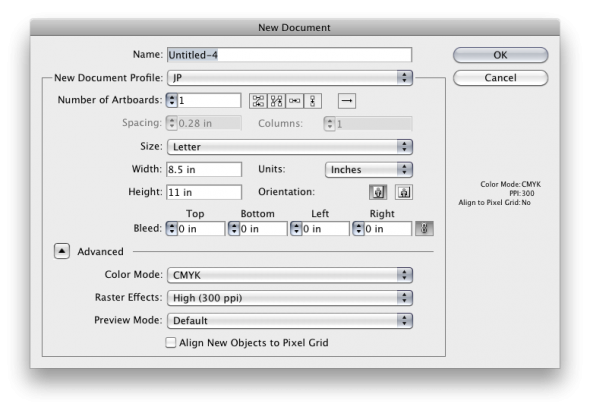
4. Now Create a New Document. Under New Document Profile, select the template you just created.
5. Change settings on the New Document Panel as needed. The new document will retain your File Info metadata. Illustrator defaults to the last used Document Profile, so every new .AI and .PDF you make from now on should include your name and contact info.
Unfortunately, I couldn’t find a way to make Illustrator apply this metadata to exported images. That will have to be done with Photoshop.
And that’s all there is to it.
Now every image on your website and every image you save or export out of Photoshop will have your name, contact information and a copyright notice invisibly embedded. This metadata should persist in the file even if the image is cropped or edited, unless someone deliberately strips it out (but the people we’re dealing with here are lazy and probably won’t).
When your orphaned image ends up on an art director’s hard drive, battered and bruised, your metadata should still be intact and available to them in Bridge, Photoshop, or any other professional imaging application. It may not survive 100% of the time, but the cost/benefit of this automated process should be a no-brainer.
Have a comment or suggestion about protecting your images online? Let me know in the comments!




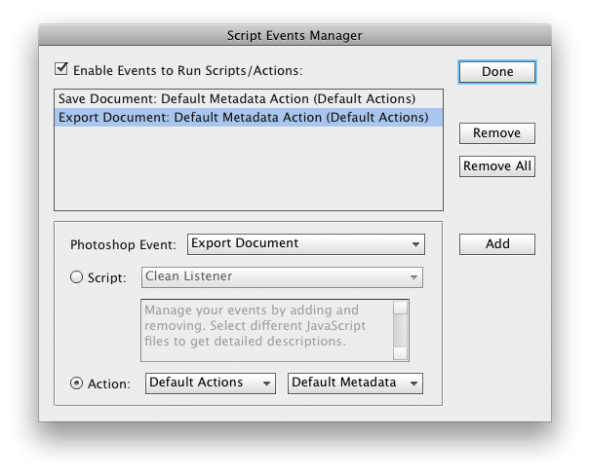


Update: I changed my Photoshop Script Event Manager events to Open and New Document (rather than Save & Export) since I may want to manually enter metadata in the future without it being cleared/overwritten on save.
Use what works for you.
This is great, thanks! You’re not a fan of BRIDGE?
@Clint
I’ve only ever opened it by accident, and never found a use for it. I could see it being useful for managing a bunch of assets at once, but (strangely) I’ve never needed to.
I’d have a real hard time working without Bridge. Being in the microstock business I have to manage quiet a lot of files. All of these sites require the metadata your talking about, including keywords, titles, descriptions, etc. Even when I am working with images that are not intended to be uploaded to a stock site (mostly files for my day job) the key words (and other metadata) play a major role in communication with all of the writers and illustrators in my department. We over 12K images any one of us ( globally)can easily search for images based on key word, category, creator, etc.
I was resistant to using it for a long time but it’s gotten much better I think. I use it constantly for organizing and view images, especially photography.
I’m with James on this one. I’ve only ever opened Bridge by accident. As far as my needs as a graphic designer, even when managing trade show sign programmes of 150+ individual signs, I find simple folder organization is easiest.
That said, now that I’ve seen this metadata tutorial, I can see how it would make it much easier to manage files in that manner.
As an aside, I wanted to applaud your comment above about the watermarks and html witchery when it comes to image theft. If they want your image, they’re going to get it; why make your real clients and customers suffer? It’s all too similar to the rampant DRM debate plagueing the video game and music industries.
Excellent post, James! I didn’t realize there was this capability. This definitely will help in the future.
@Steve
Totally agreed about the DRM stuff. It only inconveniences paying customers, pirates cut right through it.
It’s good to see this post. I am on the IPTC Photo Metadata Working Committee and it is good to see images being labeled!
I would like to point you also to the javascript we have developed which enables metadata to be entered into IPTC Core and Extension fields via Bridge, using PS versions 3 and up. (IPTC Extension is only visible out of the box in CS5 and is an important addition to IPTC Core, adding new fields and disambiguating others.)
See http://www.IPTC.org go to Metadata and download the metadata Toolkit. The script has a number of useful workflow aids.
Thank you for sharing, I find it very helpful. I have one unclear question. Is there any way to protect this metadata from overwriting by someone else? Can someone else download this image and open it in Bridge and change metadata?
@Tatiana I don’t think there’s a way to lock or protect metadata. This is just to keep honest people honest (or ignorant people ignorant).
If someone is going to replace metadata, they could more easily take a screenshot.
James… you are The Man.
Cannot thank you enough for your substantial efforts here… screenshots, explanations… bravo across the board.
Keep up the great work… please know that it is very much appreciated!
– pbeach
this is sensational James – thank you so much. The step through screenshots really helped – any chance you have a step through for setting up design themes in powerpoint and word?
James, thank you for the useful topic! It really helped me! Exactly what I have been looking for! )
This is a great post – very helpful!! I would like to save my PNG files with the same copyright info – but have been unable to find a way so far – do you know of any way to embed the meta-data into a png image?
Thanks again!
@Deanna:
From this thread at Adobe, it sounds like Photoshop can save metadata to a PNG, but for whatever reason won’t read it. The metadata will show in Bridge, but not PS.
http://forums.adobe.com/message/4413643
A nice way of using metadata, but isn’t it all worthless unless said art director or agency know what metadata is and how to look for it?
@Al — You’re right, but consider the cost vs. benefit.
The cost is 15 minutes creating an automated metadata tagging system that you never have to touch again. Even if the benefit is one additional project over the course of your entire career, it’s 15 minutes well spent.
Plus you’ve learned a thing or two about Actions, Event Manager, Templates, etc.
None of the art work you use to illustrate this column has any metadata embedded in it….
Hi, great tutorial!!!
Got a question for you, is it possible to protect the image metadata? I sell ECG’s and medical illustrations on my website, and was wondering how to protect the metadata created by me on my files so no else will be able to change it.
Kind regards.
Sorry Oscar, locking or otherwise protecting metadata isn’t possible.
Thanks you very much, for me , not a design professional , this guide help me step by step.
I know “screen grabbing/screenshots” of photos don’t grab metadata with it. How do you work around this? SOL right?
I would recommend a very small, unobtrusive watermark. Someone who’s determined to steal your image will get away with it. This is about maximizing your chances of keeping your name/brand attached to it.
Hello and welcome. Really like this game ! This is a game.
Morning,
I am new at photography and have a burning question that is really bothering me about this metadata. Perhaps it will satisfy other people question too about security.
My question is and I hope you can understand where I am coming from.
I took several great pictures of lions while in Africa. I reviewed and made changes to that metadata learning the ins and outs of it placing my information in the appropriate fields. It then dawned on me the following scenario:
What would stop an individual from copying and pasting one of these pictures and changing the name and copyright information fields in them to their name and claim that picture was theirs?
Clarification on this point would be greatly appreciated.
Thanks in advance
Al
I see you don’t monetize your blog, don’t waste your traffic, you can earn additional
cash every month. You can use the best adsense alternative for any type of website (they approve all websites),
for more details simply search in gooogle: boorfe’s tips monetize your website
Wanderfull website