
Often the most difficult and time consuming part of technical illustration is finding good reference material. While the internet serves up a limitless selection of images, finding one at an appropriate size, fidelity, viewing angle, and unambiguous copyright status, can be next to impossible.
Sometimes it’s much quicker to simply step away from your desk and go snap a photo of whatever you need. Of course, this isn’t practical if you’re drawing a submarine or a satellite, but it can help if you’re trying to fill a scene with commonplace objects.
Where it gets tricky is matching your photo reference up to the rest of the drawing. We’ve all seen drawings badly traced and assembled together from photos taken at different angles. We can recognize this because we understand perspective. So let’s apply that understanding when shooting our own photos.
Shooting Isometric Photos with an iPhone
![]()
They say that the best camera is the one you have with you (You can’t take a photo with a camera that’s not with you). For me, that’s my iPhone. But the other reason I’m using an iPhone is that it’s a smart phone and, of course, smart phones have apps.
One app in particular, BlendCamPLite (Free!), makes this process easier. It’s intended to composite multiple photos together like layers in Photoshop. But it also lets you load a photo from your library and use it as an overlay while shooting a new photo. There may be similar apps for Android, or better iPhone apps than this one, let me know!
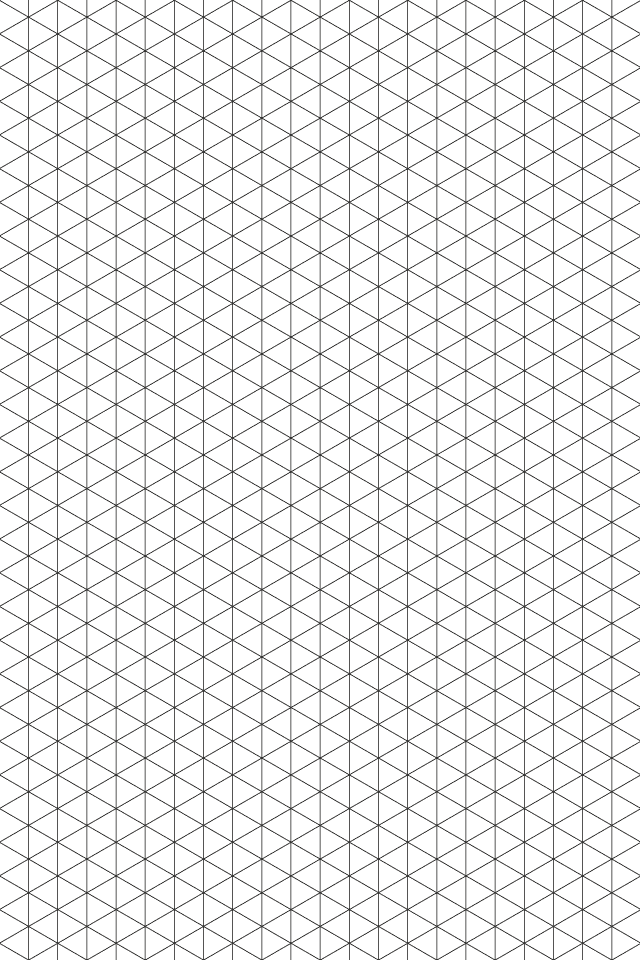
1. To begin, get the app, then load this isometric grid into your iPhone Photo Library. You can do this by creating a folder, then setting iTunes to sync that folder in the Photos tab. The images in the folder will then appear on your iPhone in the Photo Library.

2. Next, launch BlendCamPLite and press Add New.

3. Select Load from photo albums.

4. Select the isometric grid in your iPhone photo library. Then press Add New again.

5. This time select Take a photo.

6. Set up your object. Because of its irregular shape, I placed a card under mine to help align it to the grid. Select Overlap.

7. Select either Overlap a photo or Overlap a thin photo. The difference is the opacity of the overlay.

8. Voila, you can now move your camera (or object) around until it matches the grid. Press the camera icon to take the photo.

9. The app will return to the main screen and the results may not be what you expected. Select the top layer.

10. Select Darkness priority. This acts like Multiply in Photoshop.

11. That looks better. If you’re happy, select Preview & Save.

12. Select Save.

13. The photo AND the composite will be saved to your Camera Roll. Press OK.

And there you have it:

Of course the photo isn’t truly isometric, things still converge into the distance out here in meatspace. The iPhone’s wide-angle lens will emphasize that perspective, so for the best results move back as far as possible from the object and then zoom in. You should be able to get a close enough angle and then correct for any distortions when you start tracing in Illustrator.
Shooting Photos to Match Perspective on iPhone
You can follow a similar process to shoot a photo that matches the perspective of a drawing-in-progress. Below is some lineart to an illustration I finished recently. Say you wanted to add a car on the street (ignore the one popping out of the billboard), but didn’t have the time to draft it out.

You could fade out the city, and then draw lines to match the perspective, and give yourself a properly sized box on the ground to sit the car in.

Then you could crop the image to the red box to focus just on the car’s immediate surroundings. You’d load this onto your iPhone like you did the isometric grid.

Next, step outside for some fresh air and find an appropriate car. Start the app, add the perspective grid from your photo library, then go to take a photo and turn on the overlap layer. Line the car up with your perspective lines and box.

Snap the photo, then change the perspective layer to Darkness Priority. Save and you’re on your way back to your desk.

Not bad, not great. But we’re illustrators damn it, and we know how to fix it.

Shooting On-Angle Photos with a Point-and-Shoot or DSLR
The same thing could be accomplished on a point-and-shoot camera or DSLR by printing out our handy isometric grid or your perspective lineart onto tracing paper, then taping that to the LCD screen. You may have to tape the tracing paper to another sheet of paper to get it through the printer in one piece. (Frankly, I’d rather stand outside shooting 100 photos and hope one of them matches than do all that.)
UPDATE: GazVezir wrote in to tell me that this can be accomplished on Android devices with Camera Zoom FX ($4.99). I don’t have an Android to test this, so your mileage may vary.
Do you shoot your own reference material? Any tips or tricks to share? Let us know in the comments!
This is very cool James. Sure beats searching the web for an image that matches your perspective.
Nice tip, James. Looking forward to testing it out.
Very nice! Wish I had a built in grid, or a snap on filter for my bigger canon camera.
If any of you out there acutally need something like that it’s out there. I know guys have put special screens in DSLRs to show the crop of an 8×10 etc, so I would think this would be similar.
This is a fantastic tutorial.
I like your site and the info.
I’m new to the iPhone (had the droid before) and the thing I don’t get is the iTunes part. Once the image is loaded in the phone what does iTunes then do.
Once it syncs up do you need iTunes to run every time you use the grids or is the iTunes just being used to xfer the image to the phone the first and only time.
Then after you can call the image from the phones library. yes?
I couldn’t get the mentioned ios app, because it was not available in my region.
So I searched and found “Repro”. It can do the overlay during taking the picture, but if you want the lines in the result, you have to do this in another app.
Thanks for the tip, it was very useful. The mentioned App, unfortunately, isn’t available anymore, but after a little research, I found this Before and After app (https://apps.apple.com/us/app/before-and-after/id659965462) which can be used in a similar way. It saves the end result without the guides, but you can overlay it manually if needed.
Been looking for a guide to shoot isometric angle of products. Finally found it. Awesome, thank you!